
Before a zirconia restoration goes into the furnace, the material, support setup, furnace condition, and sintering program all need to match the case.
A restoration may be milled correctly, but it can still fail because of residual moisture, a dirty tray, poor placement, or the wrong furnace program. Taking a few minutes to check the setup before starting the furnace can save much more time than troubleshooting the case afterward.
Clean and Dry the Restoration
Start with the restoration itself.
After milling, remove any loose zirconia powder, especially around the margins, internal surfaces, fissures, connectors, and sprue removal areas.
If the restoration has been colored or exposed to liquid, make sure it is fully dry before sintering. Pre-sintered zirconia is porous, so the surface may look dry while moisture still remains inside.
Pay particular attention after immersion coloring or when more coloring liquid has been applied. Appearance alone is not a reliable indication that the restoration is fully dry. Follow the drying time recommended for the zirconia you are using.
Prepare the Sintering Tray and Beads
Next, check the zirconia sintering tray, bowl, or crucible before loading the restorations. It should be clean, stable, and free from obvious cracks, heavy residue, or contamination from previous cycles.
Check the zirconia sintering beads as well. They should be clean, loose, and spread evenly enough to create a stable support bed.
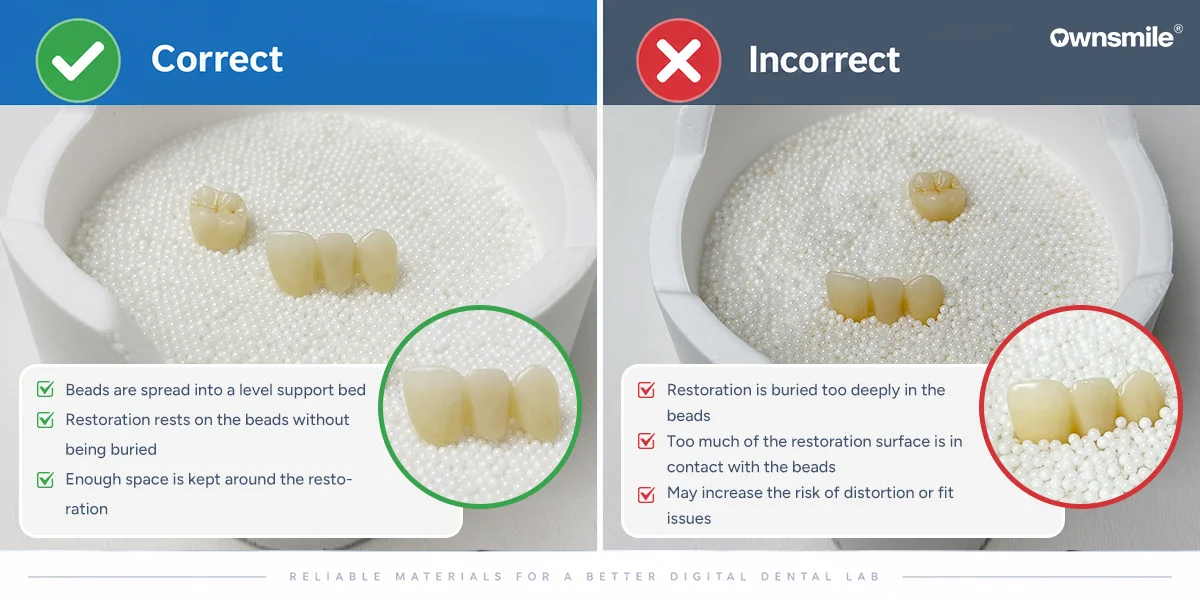
The appropriate bead depth and arrangement can vary between zirconia sintering systems. Different materials and furnaces may require different support methods, so use the setup recommended for the system you are working with.
If the beads are heavily contaminated, discolored, fused together, or no longer spread evenly, replace them before the next cycle.
Position the Restorations Correctly
Once the tray is ready, take a moment to check how the restorations are positioned.
Crowns are usually straightforward, but bridges and larger cases need a little more attention. They should be supported evenly, with enough space around them, and should not rock, tilt, or lean against another restoration.
Support can vary with the restoration design and zirconia system, so avoid treating one placement method as a fixed rule for every case. If anything looks unstable, adjust it before the cycle starts.
Check the Furnace Before Starting
Before loading the tray, take a quick look at the furnace itself.
For a routine check, look for residue or contamination in the chamber, warning messages on the display, and visible damage to the heating elements.
There is no need to turn this into a full maintenance inspection. You are simply checking that nothing looks unusual before starting the sintering cycle.
Confirm the Sintering Program
Before pressing Start, check that the selected program matches the zirconia you are using.
When switching to a new zirconia, check the manufacturer's recommended curve rather than relying on the lab's usual program. Heating and cooling requirements can differ between materials.
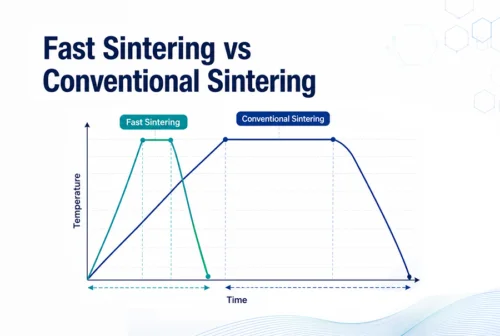
Peak temperature is only part of the cycle. Heating rate, holding time, and cooling profile may also vary by material, so review the complete program before starting the furnace.
For a fast cycle, confirm that both the zirconia and the restoration type are suitable for fast sintering.
When Should You Verify the Actual Furnace Temperature?
The temperature shown on the furnace display does not need to be verified before every cycle.
If the same unexplained change starts appearing across several cases, such as shifts in shade, translucency, or fit, it is worth checking whether the actual furnace temperature still matches the set value.
Depending on the furnace, temperature accuracy can be checked with a calibration ring or another method recommended by the manufacturer. It is also worth checking after maintenance, heating element replacement, or long-term use. One unusual case is usually not enough to blame the furnace, so look for a repeatable pattern first.
If the same issue continues, or you start seeing cracks even after the furnace has been checked, look at the rest of the workflow as well. Our guide to zirconia cracking after sintering covers the design, milling, support, furnace, and cooling stages in more detail.
Final Zirconia Sintering Checklist
Before starting the cycle, run through the setup one last time.