Zirconia cracking after sintering isn’t something you see every day. But when it does, it usually means one thing — the case is going back to remake.
In most situations, it’s not the zirconia block itself. The problem usually starts earlier, somewhere between design, milling, and sintering. The crack just shows up after firing.
So before changing everything, it’s worth stepping back and figuring out where things actually went wrong.
Common Causes of Zirconia Cracking After Sintering
1. Uneven Thickness in Design
This is probably the most common issue we see in the lab. If one area is thin and another is bulky, they don’t shrink the same way during sintering. That difference builds internal stress, and the weak spot usually fails. When thickness varies too much, stress tends to build up during sintering[1].
In real cases, cracks often show up in a few predictable areas:
- at connectors
- along margins
- near thin occlusal areas
Sometimes it cracks during cooling, sometimes right after sintering. If the crack shows up in a predictable structural area, design is usually the first place to check.
Most guidelines suggest keeping wall thickness around 0.5–1.0 mm, depending on the indication.
- Keep thickness as consistent as possible
- Avoid sudden thick–thin transitions
- Reinforce connectors in bridges
- Stay within minimum thickness, around 0.5–1.0 mm
2. Incorrect Sintering Temperature
Sintering temperature does matter, but honestly, it’s usually not the first thing we look at. If the furnace isn’t stable, or the program is off, it can affect grain structure and how the material shrinks during firing[2].
In practice, this tends to show up as:
- no clear crack pattern
- strength feels inconsistent
- multiple cases affected
Because of that, temperature is usually something we check after design and milling have been ruled out.
- correct sintering curve, around 1450–1530°C depending on material
- match program to zirconia type, such as 3Y / 4Y / 5Y
- furnace calibration
3. Cooling Too Fast
Problems with cooling usually come from trying to save time during the process. Zirconia doesn’t like uneven cooling. If the outside cools faster than the inside, stress builds up.
We’ve seen this happen in situations like:
- opening the furnace too early
- taking restorations out while still hot
- placing them on a cold surface immediately
In real cases, cracks don’t always appear immediately. They might appear:
- after sintering cycle is done
- during handling
- or even a few hours later
If a case looked fine at first but cracked later, cooling is one of the first things worth checking. Cooling rate has a real impact on zirconia reliability. Faster cooling can introduce internal stress, especially in more translucent materials[3].
- letting restorations cool naturally inside the furnace
- avoiding opening the furnace above roughly 200–300°C
No big trick here, just don’t rush this step.
4. Contamination Before Sintering
Easy to overlook, but it happens more often than people expect.
Pre-sintered zirconia can easily pick up contamination from things like:
- oil from hands
- dust or powder in the lab
- moisture in the environment
Once that happens, it can affect how the material densifies during sintering[4].
In real cases, you might see:
- cracks appear randomly
- sometimes with discoloration
- differences between cases in the same batch
If failures feel random, think contamination.
- handle with clean gloves
- avoid touching critical surfaces
- keep restorations clean and dry
- don’t leave them exposed on the bench
5. Milling-Induced Stress
A lot of cracks actually start before sintering — you just don’t see them yet. Worn burs or overly aggressive cutting can introduce small microcracks in pre-sintered zirconia. They’re not visible at this stage, so everything looks fine right after milling.
After sintering, those small defects can open up and turn into visible cracks[5]. This is why some cases look fine after milling but fail after firing, without any obvious pattern.
If multiple cases start failing like this, milling is usually one of the first things worth checking.
- bur condition, often needs replacing sooner than expected
- feed rate and spindle speed
- whether the cutting path is too aggressive
How We Troubleshoot Zirconia Cracking in the Lab
Quick Diagnosis: What We Actually Look For
If you're trying to figure out where the problem comes from, start with this quick check.
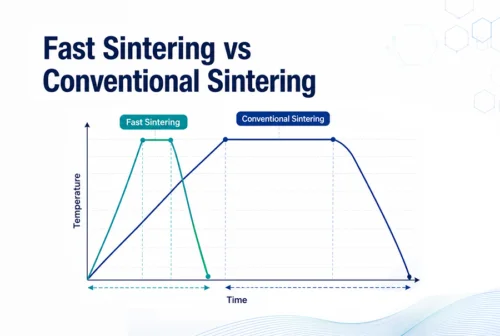
Does Fast Sintering Increase Crack Risk?
Not really. Fast sintering doesn’t directly cause cracks. What it does is reduce your margin for error.
If the workflow is stable, both fast and conventional sintering can work without issues. But if something is slightly off — thickness, temperature, or milling — fast sintering tends to expose those problems much faster.
In other words, it doesn’t create new issues, but it makes existing ones easier to see. That’s why getting the earlier steps right becomes more important when using fast programs[6]. For a deeper comparison, see our guide on fast sintering vs conventional sintering.
How to Reduce Zirconia Cracking in Daily Lab Work
From lab experience, it’s rarely one big mistake. More often, it’s small things adding up over time.
- keeping thickness consistent
- reinforcing connectors where needed
- not rushing the cooling stage
- keeping zirconia clean before sintering
- maintaining milling tools properly
- using stable, well-tested sintering programs
Final Thought
In most cases, zirconia cracking comes from small issues across different steps. They build up quietly during the workflow and only show up after sintering. Once those are under control, failures drop noticeably and results become much more predictable.
And in the lab, that kind of predictability is what everything really comes down to.
References
- Nakamura, K., et al. (2015). Influence of thickness and cooling rate on the flexural strength of full-contour zirconia. Dental Materials Journal, 34(6), 882–889.
- Stawarczyk, B., Özcan, M., Hallmann, L., et al. (2013). The effect of zirconia sintering temperature on flexural strength, grain size, and contrast ratio. Clinical Oral Investigations, 17(1), 269–274.
- Kim, H. K., & Kim, S. H. (2021). Effect of cooling rate during glazing on the mechanical and optical properties of monolithic zirconia with 3 mol% yttria content. Materials, 14(23), 7474.
- Okuda, Y., Noda, M., Tsuruki, J., & Ban, S. (2013). Contamination of dental zirconia before final firing: Effects on mechanical properties. Dental Materials Journal, 32(6), 940–946.
- Luthardt, H. O., et al. (2004). Machining effects on zirconia. Journal of Dental Research, 83(10), 800–804.
- Stawarczyk, B., et al. (2023). Sintering strategies for dental zirconia ceramics: slow versus rapid? Current Oral Health Reports, 10, 22–30.